An Overview of NTFS
In order to store data on a local partition on a Windows server, you have to format it with a file system. The system that you use influences the manner in which data is stored on the disk. It also specifies the security that can be defined for folders and files stored on the partitions. Although Windows servers offer support for the File Allocation Table (FAT) file system, NT file system (NTFS), and CDFS (Compact Disc File System), the file systems generally utilized by local partitions is the FAT file system and NTFS file system.
The FAT partitions utilized by operating systems such as Microsoft DOS, Windows 95, Windows 98, and Windows Me do not allow you to specify security for the file system after a user has logged on. What this means is that any data stored in a FAT partition is available to each user that shares the same computer. The FAT file system also includes no support for file compression, or encryption. You cannot store Macintosh files on FAT partitions. Because Windows 2000, Windows XP and Windows Server 2003 support FAT32, you may choose to configure FAT32 partitions if you need dual-boot capability to Windows 95, Windows 98 and Windows Me.
NTFS partitions on the other hand enable you to specify security for the file system after a user has logged on. NTFS permissions control the access users and groups have to files and folders on NTFS partitions. You can set an access level for each particular user to the folders and files hosted on NTFS partitions. You can allow access to the NTSF files and folders, or you can deny access to the NTFS files and folders. In this manner, NTFS supports local security. The NTFS file system also includes other features such as encryption, disk quotas, file compression, mounted drives, NTFS change journal, and multiple data streams. You can also store Macintosh files on NTFS partitions.
Comparing NTFS 4.0 and NTFS 5.0
The two available versions of NTFS are:
- NTFS 4.0: This is the version of NTFS utilized with Windows NT 4.0. Even though it supports access control on files and folders, it does not support the majority of Windows 2000 and Windows Server 2003 file system features. It does however include support for file compression.
- NTFS 5.0: This version of NTFS supports all the previously mentioned features of the NTFS file system. NTFS version 5.0 is utilized with Windows 2000 and Windows Server 2003.Windows NT 4.0 systems that are running Service Pack 4 or later are able to access NTFS 5.0 files and folders.
The key differences between NTFS 4.0 and NTFS 5.0 are summarized below:
- Maximum volume size:
- NTFS 4.0: 32 GB
- NTFS 5.0: 2 terabytes on Master Boot Record (MBR) disks, and 18 exabytes on GUID Partition Table (GPT) disks.
- Maximum file size:
- NTFS 4.0: 32 GB
- NTFS 5.0: With NTFS 5.0, file size is limited by the size of the volume.
- Support for advanced file access permissions:
- NTFS 4.0: Yes
- NTFS 5.0: Yes
- Support for file compression:
- NTFS 4.0: Yes
- NTFS 5.0: Yes
- Support for encryption, disk quotas, sparse files, remote storage and Active Directorystructures:
- NTFS 4.0: No
- NTFS 5.0: Yes
NTFS File and Folder Permissions
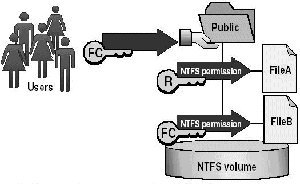
The main feature of the NTFS file system is that you can defines local security for files and folders stored on NTFS partitions. You can specify access permissions on files and folders which control which users can access the NTFS files and folders. You can also specify what level of security is allowed for users or group. NTFS enables you to specify more precise permissions that what share permissions enable. You can only specify share permissions on folders. NTFS permissions can be set for folers and files. On NTFS partitions, permissions are applied to users who access the computer locally, and who access a NTFS folder which has been shared over the network.
By default, permissions of NTFS volumes are inheritable. What this means is that files and subfolders inherit permissions from their associated parent folder. You can however, configure files and subfolders not to inherit permissions from their parent folder.
You can specify NTFS permissions at the file level and the folder level. The NTFS permissions that can be set at the folder level are listed below:
- Full Control: Enables a user to view or change a folder’s attributes, permissions and take ownership. A user is also able to create, modify and delete folders. Users can also traverse folders and execute files that contain programs stored in a folder. The Full Control permissions allow users to compress files as well.
- Read and Execute: The rights enabled by this permission include traversing folders and executing files in the folders, listing a folder’s content, and viewing the attributes of folders.
- Write: Users are able to create new folders, new subfolders and new files in the folders. A user is also able to change a folder’s attributes.
- List Folder Contents: Users are able to transverse folders, list the contents of the folder, and view a folder’s attributes.
- Modify: A user can change the properties of a folder, create new folders, and also delete folders.
- Read: This permission enables a user to view the folder, and any subfolders and files stored within the folder.
The NTFS permissions that can be set at the file level are listed below:
- Full Control: Enables a user to view or change a files attributes, create and delete files, compress files, view the attributes of files, and add data to files. A user can also execute files.
- Read and Execute: The rights enabled by this permission include executing files in the folders, and viewing the attributes of files.
- Write: Users are able to create new files, change a file’s attributes, write data to files, view file ownership and permissions, and overwrite files
- Modify: A user can change the properties of a file, create new files, delete files, write data to files, and view the attributes of files.
- Read: This permission enables a user to view files and the files’ attributes.
With Windows Server 2003, basic NTFS permission settings are assigned for five default users and groups when a new NTFS partition is created. The users/groups and the default permissions created for them are summarized below:
- Administrators: Full Control – Allow
- System: Full Control – Allow
- Users: Read – Allow, Read and Execute – Allow, List Folder Contents – Allow
- Creator Owner: Have no default permissions set
- Everyone: Have no default permissions set
Before you can apply NTFS permissions, you have to format the disk partition as an NTFS partition. NTFS permissions are applied through Windows Explorer. You simply have to right-click the particular file or folder that you want to control access to and select Properties from the shortcut menu. The Properties dialog box of NTFS files and folders contains a Security tab. This the tab utilized to apply NTFS permissions.
How to configure NTFS permissions for files and folders on NTFS partitions
- Navigate to Windows Explorer
- Right-click the particular file or folder that you want to control access to, and click Properties from the shortcut menu.
- When the Properties dialog box of the folder/file opens, click the Security tab
- If you want to specify new ermissions, click the Add button.
- The Select Users, Computers, Or Groups dialog box opens next.
- In the Enter The Object Names To Select section of the dialog box, insert the name of the user/group that you want to specify permissions for. Click OK
- When the Security tab appears, highlight the user or group in the topmost box, and then set the permissions that should be applied for that particular user or group.
- Click OK.
How to configure permission inheritance
Click the Advanced button on the Security tab to access the Advanced Security Settings dialog box. This is where you configure permission inheritance. You can set the following permission inheritance options:
- Allow inheritable permissions from the parent to propagate to this object and all child objects. Include these with entries explicitly defined here.
- Replace permission entries on all child objects with entries shown here that apply to child objects.
When you clear the Allow inheritable permissions from the parent to propagate to this object and all child objects. Include these with entries explicitly defined here checkbox, a security dialog box is displayed. The security dialog box allows you to either completely remove the existing inherited permissions, or change the existing inherited permissions to explicit permissions.
How to configure NTFS special permissions
NTFS special permissions enable administrators to set precise user access permissions for NTFS files and folders. Special permissions is the result of the basic file and folder permissions being split even further into more precise or specific permissions. NTFS special permissions are also referred to as NTFS advanced permissions. You can specify NTFS special permissions by clicking the Advanced button from the Security tab of the file or folder’s Property dialog box. The Advanced Security Settings dialog box opens. You can view existing special permission entries by selecting the particular user/group, and then clicking the Edit button. Clicking the Edit button opens the Permission Entry dialog box. This is where you can perform the following:
- The Change button can be used to modify the set of users or groups stored in the Name box.
- You can use the Allow checkbox and Deny checkbox to change the permission entries.
- The Apply Onto drop-down list box can be used to apply the special permissions to specific objects.
The NTFS special permissions are listed below:
- Full Control: The user can perform all the NTFS special permissions listed below
- Traverse Folder/Execute File: Traverse Folder enables users to navigate through folders and files beneath the location at which the permission is applied. Execute File enables application programs to be run.
- List Folder/Read Data: List Folder either allows or denies the names of files and subfolders of a folder to be viewed. Read Data enables the data within the files to be read.
- Read Attributes: Either allows or denies the attributes of folders and files to be read.
- Read Extended Attributes: Either allows or denies the extended attributes of folders and files to be read.
- Create Files/Write Data: Create Files allows or denies new files to be created within folders. Write Data either allows or denies changes to be made to files, and to overwrite files.
- Create Folders/Append Data: Either allows or denies new subfolders to be created within a folder, and allows or denies changes to be made to the end of a file.
- Write Attributes: Allows the attributes on a subfolder and file to be changed.
- Write Extended Attributes: Allows the extended attributes on a subfolder and file to be changed
- Delete Subfolders and Files: Allows files and subfolders to be deleted even though the elete permission is not granted on the subfolder or file.
- Delete: Enables file or folders to be deleted.
- Read Permissions: Allows the permissions that have been applied to folders and files to be viewed.
- Change Permissions: Allows the permissions that have been applied to folders and files to be changed.
- Take Ownership: Allows the user to modify the owner of the file or folder.
How to determine NTFS effective permissions
You typically need to determine a user’s effective permissions before you assign any other permissions to the particular user for a folder/file. A user’s effective permissions are determined by:
- Individual user permissions
- Permissions inherited from parent folders
- Permissions inherited from group membership
You can view the effective permissions of a user on the Effective Permissions tab on the Advanced Security Settings dialog box.
- Open Windows Explorer
- Right-click the particular file or folder and choose Properties from the shortcut menu
- When the Properties dialog box of the file/folder opens, click the Security tab
- To open the Advanced Security Settings dialog box, click the Advanced button
- When the Advanced Security Settings dialog box opens, click the Effective Permissions tab.
- To specify the user or group that you want to determine effective permissions for, click Select, and enter the name of the particular user or group. Click OK
- The effective permissions for the user or group that you have chosen to view are displayed next.
How to determine NTFS permissions for copied or moved files
When you copy or move NTFS files to different locations, it is possible that the NTFS permissions that have been originally specified for the files can indeed change in the new file location. Whether the permissions changes or not, is determined by the following:
- Was the file moved to an NTFS volume or a partition that is not NTFS formatted such as FAT partitions
- Was the file copied to a different location on the identical NTFS volume, or was it copied to a different NTFS volume
- Was the file moved or copied
You can use the rules detailed next to determine whether an NTFS file that is moved or copied would retain its prior permissions:
- Files that are copied or moved to FAT partitions do not retain any of their prior NTFS permissions in the new location.
- Files that are moved from one folder to a different location on the identical NTFS volume keep all its prior NTFS permissions.
- Files that are copied from one folder to a different location on the identical NTFS volume inherit the NTFS permissions of the destination location or folder.
- Files that are moved from one location or folder to a folder on a different NTFS volume inherit the NTFS permissions of the destination location or folder.
How to configure folder and file auditing on NTFS partitions
Before you can configure folder and file auditing on NTFS partitions, auditing for object access – Audit Object Access; has to be enabled for the computer. You have to be a member of the local Administrators group to enable an audit policy on the local machine. If you want to set auditing policy via Active Directory, you must be a member one of the following groups: Domain Admins, Enterprise Admins. After auditing for object access has been enabled, you can define the files or folders that should be audited; and specify the users and groups that should be tracked. You either audit events for success or failure.
Use the steps below to configure NTFS folder and file auditing,
- Right-click the folder or file you want to set auditing for and choose Properties, from the shortcut menu.
- Click the Security ta when the Properties dialog box of the file or folder opens.
- Click the Advanced button
- When the Advanced Security Settings dialog box opens, click the Auditing tab.
- Click the Add button to open the Select User, Computer, Or Group dialog box.
- Insert the names of the users or groups whose actions you want to track. Click OK.
- When the Auditing Entry For Data dialog box is displayed, select the events that should be audited.


